Spine 像素动画:像素不糊、逐帧感跑步和跳跃
像素画放进 Spine,常见三个问题:画面发糊、旋转后的肢体变成一块块倾斜的大像素、关节处露出缝隙。只要知道三处设置,这些都能解决。本文讲清原因和做法——图集、PSD、游戏引擎各一处——并用一个 56×79 像素的角色做完整示例:在 Riggy 里用对话搭骨骼,做出待机、逐帧感的跑步和跳跃,每一句提示词原样附上。
最终效果
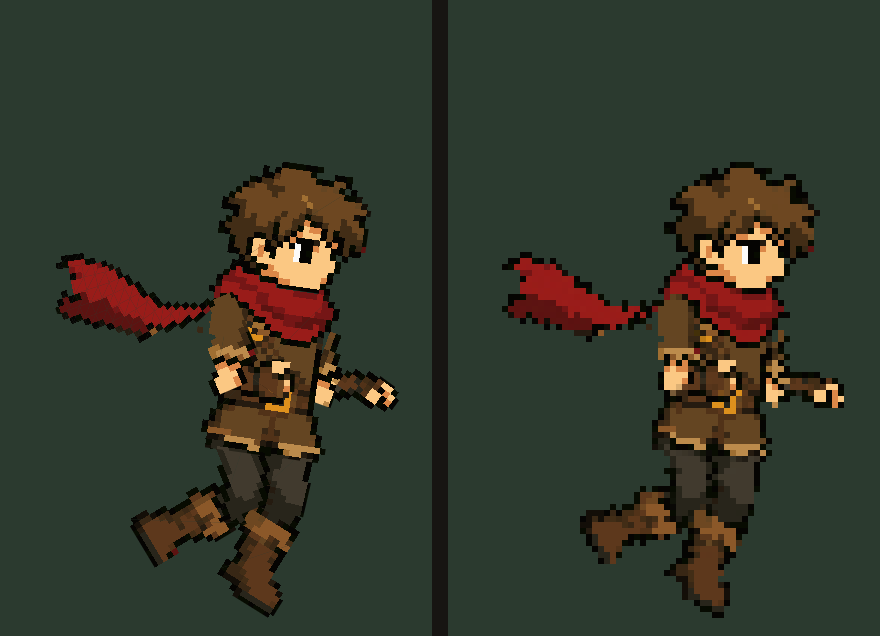
同一份导出的 Spine 4.2 骨骼,用官方 spine-canvas 运行时画了两遍。左边直接放大:每个旋转的部件都是倾斜的大像素。右边先按原始尺寸绘制(一个美术像素对应一个屏幕像素),再整体放大,所有像素都落在网格上,连旋转的肢体也一样。这就是像素游戏的观感——它取决于渲染方式,而不是文件本身。可以切换 idle、run、jump。
为什么像素画在 Spine 里会“坏”
- 发糊。图集告诉运行时如何采样纹理,常见的
filter: Linear, Linear会混合相邻像素——对手绘图没问题,对像素画就是一团糊。像素画需要filter: Nearest, Nearest。现在 Riggy 发现素材是像素画(硬边缘、颜色少)时会自动写入这一行;用其他工具时请手动改。如果图集是直通 alpha(straight alpha),运行时也要关掉预乘 alpha,否则角色边缘会出现黑边。 - 倾斜的大像素。Spine 旋转的是部件的贴图。放大 6 倍后,前臂转 20° 就成了一块倾斜的 6×6 方格,旁边的躯干却是正的——像素画圈称之为 mixel。解决办法:按游戏原始分辨率绘制骨骼,再把整帧放大,旋转就会在真实的像素网格上重新采样。网页、Phaser、PixiJS、Unity 的代码见下文。
- 关节缝隙。三个像素宽的小腿,后面没有东西能挡住缝隙。把每个轴心放在关节中心,并让相邻图层在那里重叠——下一节说明做法。
PSD 怎么准备
角色 56×79 像素,22 种颜色,拆成 11 个图层:头、躯干、围巾尾巴,两只手臂和两条腿各两节。文件保持原始尺寸(一个像素就是一个像素),并检查四点:
- 近侧肢体在上层。3/4 侧视角里,离观众近的手臂和腿要画在躯干和远侧肢体之上。角色朝右时,近侧通常是画面左边那一侧,不管图层叫什么名字。我们一开始弄反了,近侧手臂每次摆动都会钻到身体后面。
- 整个肩头归手臂。袖子和上衣连在一起、没有轮廓线时,容易从轮廓开始处切——也就是袖子中间。这样关节就会落在真正的肩膀下方。
- 只在看不见的地方重叠。大腿向上延伸几个像素藏进上衣下面,小腿藏进大腿下面。会移动到外面的部件不要补料:围巾飘到身后时,垫在下面的填充会露出来。
- 名字简单明了。
head、torso、arm_back_upper、shin_front……模型会读这些名字。
更多见素材准备(英文)。
第 1 句:骨骼、待机和逐帧感的跑步
Pixel-art hero for a side-scrolling platformer, 56x79 px, facing right, drawn three-quarter with the hips side by side; every image pixel is one game pixel. Rig: a hip bone at the waist; torso on the hip, head on the torso at the neck; each arm shoulder -> upper arm -> forearm with the hand, the shoulder joint in the middle of the top of the sleeve; each leg hip -> thigh -> shin with the boot. The scarf tail is a mesh on a chain of 3 bones; the first bone starts exactly where the tail comes out of the knot at the neck (the top right end of the tail), so the knot hides the joint. Angles below are on screen: 0 = straight down, plus = forward (right). Joints bend only the natural way: knees back (the foot always behind the knee), elbows forward (the forearm always in front of the upper arm). Two animations. idle - 1 s loop: calm breathing, the torso rises 1 px, the head follows a beat later, the arms sway 1-2 px; the legs take part: the knees give a little and the thighs counter the body, so it never sways over still legs; the feet stay planted; the scarf waves slowly from root to tip. run - 0.6 s loop, 8 poses with stepped keys every 0.075 s, the scarf too, moves in whole pixels. Legs alternate, the far leg (right in the picture) does what the near leg does 0.3 s later: near thigh -18 at 0, 0 at 0.15, +18 at 0.3, 0 at 0.45; far thigh +18 at 0, 0 at 0.15, -18 at 0.3, 0 at 0.45. On each passing pose the lifted shin folds back about 70 degrees from its thigh. The near leg passes in front of the far one. Arms alternate opposite to the leg on the same side: near upper arm +25 at 0, -25 at 0.3; far upper arm -25 at 0, +25 at 0.3; each forearm stays about 80 degrees forward of its upper arm the whole time. The torso leans forward 8 degrees and dips 1 px on each contact. The scarf streams back to the left close to horizontal, within 10 degrees, and waves 2-3 px from root to tip.
这句提示词里对像素画最关键的三点:每 0.075 秒一个阶梯关键帧(stepped)——跑步的 8 个姿势各自定格,不做补间,看起来像手绘逐帧;整像素移动——在这个尺寸下,半个像素的位移就是模糊或抖动;写方向,不只写角度——“膝盖只向后弯,脚始终在膝盖后面”。之前的一次尝试只写了小腿“折叠 70°”,模型就把它向前折了。
骨骼、待机和围巾一次就对:围巾是挂在三根骨骼链上的网格,从脖子到末端呈波浪摆动;待机时每次呼吸膝盖都会微微弯曲,身体不会在僵直的双腿上晃。跑步还不对。
第 2 句:为什么两条腿同时动
两条腿同时张开、同时合拢,像开合跳,手臂也一样。原因是一个手工做动画也值得知道的 Spine 细节:关键帧的数值是相对于初始姿势(setup pose)的偏移。这个角色两脚分开站立,两条大腿在初始姿势下就相差约 35°。给两条腿同样的 ±18°,就会得到一步大一步小——第二次着地永远不是第一次的镜像。
解决办法:按每条腿自己的初始角度换算偏移——想要的屏幕角度减去骨骼本来的角度。我们几行代码算好,把数字交给模型:
run: the legs and arms still move together instead of alternating - the screen angles were applied as offsets, but the two legs and the two arms stand at different angles in the rest pose. I converted them for you. Replace the rotate keys of these bones in run with exactly these offsets, stepped, at 0, 0.075, 0.15, 0.225, 0.3, 0.375, 0.45, 0.525, and the key at 0.6 equal to the one at 0: thigh_back 4, 13, 22, 31, 40, 31, 22, 13; thigh_front 5, -4, -13, -22, -31, -22, -13, -4; shin_back -16, -56, -81, -46, -16, -21, -21, -21; shin_front -14, -19, -19, -19, -14, -54, -79, -44; arm_back_upper 56, 49, 31, 13, 6, 13, 31, 49; arm_front_upper -37, -30, -12, 6, 13, 6, -12, -30; arm_back_lower 65 at every key; arm_front_lower 74 at every key. Add the hip dip: hip translate y -1 at 0 and 0.3, 0 at 0.15 and 0.45, stepped like the rest. Keep the torso lean, the head, the scarf and idle as they are.
现在远侧腿正好比近侧腿晚 0.3 秒做同样的动作,两次着地互为镜像。不想计算的话,也可以用鼠标摆好两个着地姿势:在 Motion 模式下点时间轴上的时刻,转动大腿——免费,跑步的其余节奏不变(调整某一时刻的姿势(英文))。

第 3 句:跳跃
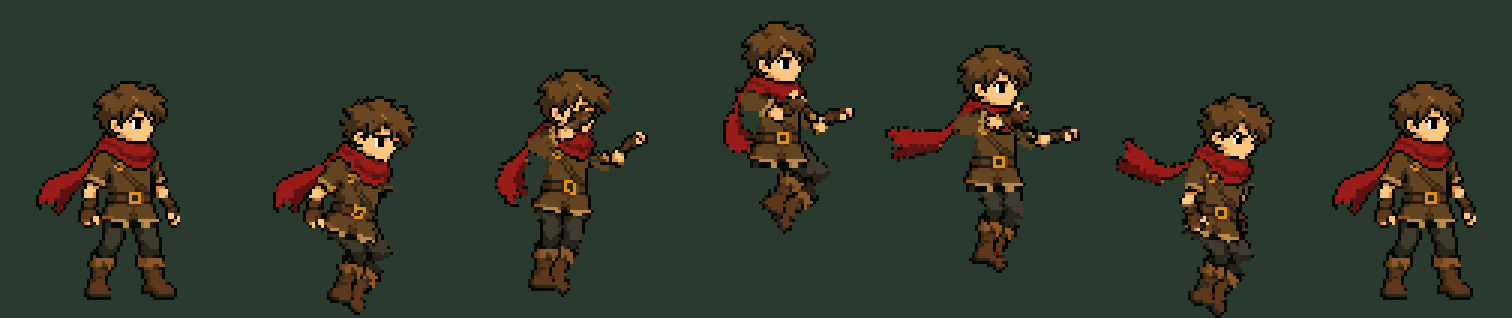
Add jump - 0.9 s, plays once, stepped keys like run, whole pixels: rest, crouch (knees bent, torso leans forward, arms back), take-off (legs straight, arms swing up), rise with the knees tucked up, fall with the legs reaching down and the arms up for balance, landing crouch, back to rest. Use exactly these offsets at 0, 0.15, 0.3, 0.45, 0.6, 0.75, 0.9 (I converted them from screen angles): torso rotate 0, -15, -5, 0, 0, -12, 0; hip translate y 0, -4, 4, 20, 12, -4, 0; thigh_back 0, 57, 17, 82, 37, 52, 0; thigh_front 0, 22, -18, 37, -3, 17, 0; shin_back 0, -71, -16, -111, -41, -66, 0; shin_front 0, -69, -14, -99, -34, -64, 0; arm_back_upper 0, -2, 138, 83, 113, 15, 0; arm_front_upper 0, -55, 85, 30, 60, -38, 0; arm_back_lower 0, 15, 15, 45, 5, 25, 0; arm_front_lower 0, 24, 24, 54, 14, 34, 0. The scarf trails the motion: it drops behind while he rises and lifts up while he falls, settling after the landing. Events: 'takeoff' at 0.3 and 'land' at 0.75. Leave idle and run as they are.
同样的做法:用文字描述姿势,按骨骼给出数字,再加两个给游戏用的事件——takeoff 启动物理,land 触发尘土和音效。
第 4 句:肩膀后面的“驼峰”
手臂摆得最大时,近侧肩膀后面会凸出一块。关节放在了肩头的上边缘——模型就是这样理解第一句里的“the middle of the top of the sleeve”的——于是肩头绕着一个角转,而不是原地转。
The shoulder joints sit on the edge of the shoulder cap, so on big swings the cap sticks out behind like a hump. Move both joints to the middle of the cap without moving anything on the canvas (set_bone with hold): arm_back_upper to x 23.53, y 7.53; arm_front_upper to x 18.79, y -10.46 (local to torso). Do not change any keys.
移动关节但保持图片不动,不会改变任何关键帧,画布上也什么都不动,只有轴心移动,所有动画里手臂都绕肩膀中心转。用鼠标的话,按住 ⌥ 拖动骨骼起点即可(全部鼠标操作(英文))。下次我们会直接写“肩关节放在肩头中心”。
在游戏引擎里保持像素清晰
导出的是标准 Spine 4.2 JSON,图集里已经写着 filter: Nearest, Nearest。剩下的就是按原始分辨率绘制。
网页(spine-canvas)——上面的演示就是这样做的:
// 1 art pixel = 1 canvas pixel
low.width = 72; low.height = 106;
lowCtx.imageSmoothingEnabled = false;
renderer.draw(skeleton);            // spine-canvas, into the small canvas
// a pixel is either there or not
const img = lowCtx.getImageData(0, 0, 72, 106);
for (let i = 3; i < img.data.length; i += 4)
  img.data[i] = img.data[i] >= 128 ? 255 : 0;
lowCtx.putImageData(img, 0, 0);
// scale up with nearest-neighbour
screenCtx.imageSmoothingEnabled = false;
screenCtx.drawImage(low, 0, 0, 72 * 6, 106 * 6);
Phaser 4——把游戏尺寸设成美术的原始分辨率,让 Phaser 放大(加载骨骼见Phaser 教程(英文)):
new Phaser.Game({
  width: 320, height: 180,     // the game's native resolution
  pixelArt: true,              // nearest filtering, rounded positions
  scale: { zoom: 4 },          // scaled up as whole pixels
  plugins: { scene: [{ key: "spine.SpinePlugin", plugin: spine.SpinePlugin, mapping: "spine" }] },
  scene: Level,
});
PixiJS 8——同样的思路:小画布、最近邻采样、用 CSS 放大(见PixiJS 教程(英文)):
import { Application, TextureSource } from "pixi.js";
TextureSource.defaultOptions.scaleMode = "nearest";
const app = new Application();
await app.init({ width: 320, height: 180, antialias: false, resolution: 1 });
app.canvas.style.width = "1280px";           // 4x
app.canvas.style.imageRendering = "pixelated";Unity——图集页贴图的 Filter Mode 设为 Point (no filter),Compression 设为 None;添加 Pixel Perfect Camera(2D URP)并勾选 Upscale Render Texture,旋转的部件就会按参考分辨率重新采样(导入见Unity 指南(英文))。
做像素动画时省提示词的方法
- 写方向。“膝盖向后弯,肘部向前弯”“围巾向左后方飘,接近水平”。光写角度,可能朝任何方向。更多见怎么写提示词(英文)。
- 要逐帧感就要阶梯关键帧,并要求整像素移动。
- 按画面说左右。“近侧腿(画面左边)”不会有歧义,front / back 两种理解都可能。
- 要精确姿势就给偏移——想要的屏幕角度减去骨骼的初始角度——或者直接用鼠标摆。
- 在 1:1 渲染上检查。平滑放大时看着没问题的姿势,在原始尺寸下手可能少一个像素。
下一步:一张图自动分层
目前 Riggy 需要分好层的 PSD。我们正在做一个工具:把一张角色图切成顺序正确、命名清楚的图层,并补画被遮住的部分。手绘大角色的例子见游戏怪物的整套战斗动画。用 Spine 运行时发布游戏需要 Esoteric Software 的 Spine 许可证,无论骨骼是谁做的。