Pixel art in Spine: crisp pixels, a frame-by-frame run and a jump
Pixel art and Spine get along once you know three settings. Without them the sprite goes blurry, rotated limbs turn into a mess of tilted oversized pixels, and joints open up. Below are those three fixes — in the atlas, in the PSD and in your engine — and a 56×79 hero rigged by chat in Riggy with idle, a frame-by-frame run and a jump, every prompt as it was sent.
The result
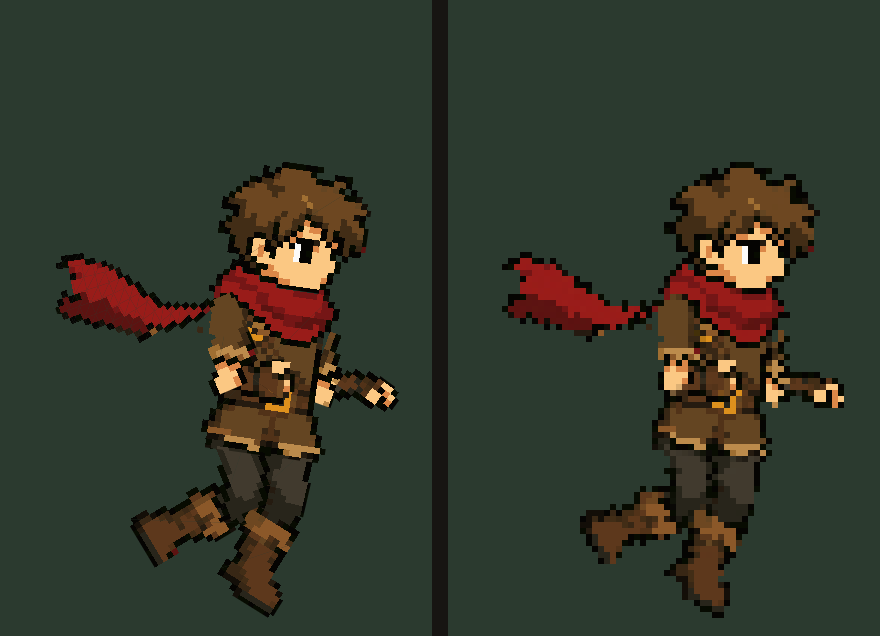
The same exported Spine 4.2 skeleton drawn twice by the official spine-canvas runtime. On the left it is simply scaled up: every rotated part shows big tilted pixels. On the right it is drawn at its own size — one art pixel per screen pixel — and only then scaled up, so every pixel stays on the grid, rotated limbs included. That is the look of a pixel-art game, and it is a rendering choice, not a property of the file. Switch between idle, run and jump.
Why pixel art fights Spine
Three things go wrong, each with its own fix.
- Blur. The atlas tells the runtime how to sample the texture, and the usual
filter: Linear, Linearaverages neighbouring pixels — fine for painted art, mush for a sprite. Pixel art needsfilter: Nearest, Nearest. Riggy now writes it by itself when the art is pixel art (hard edges, a small palette); with other tools change that line by hand. Turn off premultiplied alpha in the runtime too if the atlas is straight alpha, or dark fringes appear around the sprite. - Rotated, oversized pixels. Spine rotates the texture of a part. Scaled up 6× on screen, a 20° turn of a forearm becomes a tilted block of 6×6 squares next to an upright torso — pixel artists call these mixels. The cure is to draw the skeleton at the game's native resolution and scale the whole frame up afterwards: the rotation is then resampled on the real pixel grid. Code for the web, Phaser, PixiJS and Unity is below.
- Holes at the joints. A shin three pixels wide has nothing to hide a gap behind. Put every pivot in the middle of the joint, and let the neighbouring layers overlap there — the next section shows how.
The PSD
The hero is 56×79 pixels in 22 colours, cut into 11 layers: head, torso, scarf tail, two arms and two legs in two pieces each. Keep the file at native size — one pixel is one pixel — and check four things:
- Near limbs on top. In a three-quarter view the arm and the leg closer to the viewer are drawn over the body and over the far pair. Facing right, those are usually the ones on the left of the picture, whatever the layer names say. Ours started the other way round, and the near arm vanished behind the body on every swing.
- The whole shoulder goes with the arm. Where the sleeve merges into the tunic with no outline, it is tempting to cut where the outline begins — halfway down the sleeve. The joint then lands below the real shoulder.
- Overlaps only where they stay hidden. The thighs continue a few pixels up under the tunic, the shins under the thighs. Do not pad a part that moves out into the open: filler under the scarf showed up as a stray block once the scarf streamed out behind him.
- Plain names.
head,torso,arm_back_upper,shin_front… the model reads them.
More in Preparing art.
Prompt 1: the rig, idle and a frame-by-frame run
Pixel-art hero for a side-scrolling platformer, 56x79 px, facing right, drawn three-quarter with the hips side by side; every image pixel is one game pixel. Rig: a hip bone at the waist; torso on the hip, head on the torso at the neck; each arm shoulder -> upper arm -> forearm with the hand, the shoulder joint in the middle of the top of the sleeve; each leg hip -> thigh -> shin with the boot. The scarf tail is a mesh on a chain of 3 bones; the first bone starts exactly where the tail comes out of the knot at the neck (the top right end of the tail), so the knot hides the joint. Angles below are on screen: 0 = straight down, plus = forward (right). Joints bend only the natural way: knees back (the foot always behind the knee), elbows forward (the forearm always in front of the upper arm). Two animations. idle - 1 s loop: calm breathing, the torso rises 1 px, the head follows a beat later, the arms sway 1-2 px; the legs take part: the knees give a little and the thighs counter the body, so it never sways over still legs; the feet stay planted; the scarf waves slowly from root to tip. run - 0.6 s loop, 8 poses with stepped keys every 0.075 s, the scarf too, moves in whole pixels. Legs alternate, the far leg (right in the picture) does what the near leg does 0.3 s later: near thigh -18 at 0, 0 at 0.15, +18 at 0.3, 0 at 0.45; far thigh +18 at 0, 0 at 0.15, -18 at 0.3, 0 at 0.45. On each passing pose the lifted shin folds back about 70 degrees from its thigh. The near leg passes in front of the far one. Arms alternate opposite to the leg on the same side: near upper arm +25 at 0, -25 at 0.3; far upper arm -25 at 0, +25 at 0.3; each forearm stays about 80 degrees forward of its upper arm the whole time. The torso leans forward 8 degrees and dips 1 px on each contact. The scarf streams back to the left close to horizontal, within 10 degrees, and waves 2-3 px from root to tip.
Three choices in this prompt matter for pixel art. Stepped keys every 0.075 s — the run holds each of its 8 poses instead of tweening between them, so it reads like hand-drawn frames. Whole pixels — a half-pixel move is a blur or a jitter at this size. Directions, not just angles — "knees only bend backwards, the foot always stays behind the knee". An earlier try said only that the shin "folds 70°", and the model folded it forward.
The rig, the idle and the scarf were right after this prompt: the scarf is a mesh on a chain of three bones and waves from the neck to the tip, and in idle the knees give a little with each breath so the body does not sway over frozen legs. The run was not.
Prompt 2 — why both legs moved together
The legs spread and closed at the same time, like a jumping jack, and so did the arms. The reason is a Spine detail worth knowing even if you animate by hand: keyframe values are offsets from the rest pose. This hero stands with his feet apart, so his two thighs already point about 35° apart at rest. Give both the same ±18° and you get one wide stride and one closed one — the second contact never mirrors the first.
The fix is to work out each leg's offsets from its own rest angle: the angle you want on screen minus the angle the bone already has. We did that in a few lines and handed the model the numbers:
run: the legs and arms still move together instead of alternating - the screen angles were applied as offsets, but the two legs and the two arms stand at different angles in the rest pose. I converted them for you. Replace the rotate keys of these bones in run with exactly these offsets, stepped, at 0, 0.075, 0.15, 0.225, 0.3, 0.375, 0.45, 0.525, and the key at 0.6 equal to the one at 0: thigh_back 4, 13, 22, 31, 40, 31, 22, 13; thigh_front 5, -4, -13, -22, -31, -22, -13, -4; shin_back -16, -56, -81, -46, -16, -21, -21, -21; shin_front -14, -19, -19, -19, -14, -54, -79, -44; arm_back_upper 56, 49, 31, 13, 6, 13, 31, 49; arm_front_upper -37, -30, -12, 6, 13, 6, -12, -30; arm_back_lower 65 at every key; arm_front_lower 74 at every key. Add the hip dip: hip translate y -1 at 0 and 0.3, 0 at 0.15 and 0.45, stepped like the rest. Keep the torso lean, the head, the scarf and idle as they are.
Now the far leg does exactly what the near one did, 0.3 s later, and the two contacts mirror each other. If you would rather not compute anything, pose the two contact moments with the mouse: in Motion mode click a moment on the track and turn the thighs — free, and the rest of the run keeps its timing (reshaping a moment).

Prompt 3 — the jump
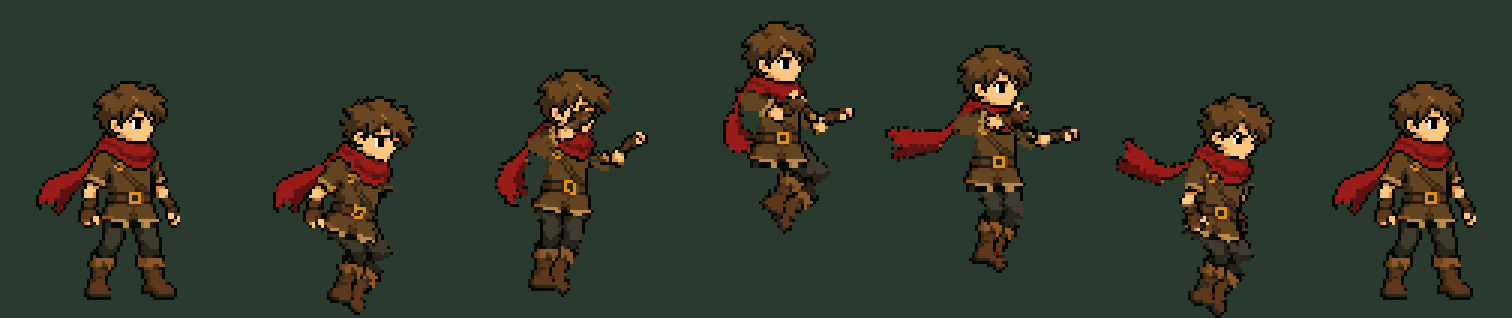
Add jump - 0.9 s, plays once, stepped keys like run, whole pixels: rest, crouch (knees bent, torso leans forward, arms back), take-off (legs straight, arms swing up), rise with the knees tucked up, fall with the legs reaching down and the arms up for balance, landing crouch, back to rest. Use exactly these offsets at 0, 0.15, 0.3, 0.45, 0.6, 0.75, 0.9 (I converted them from screen angles): torso rotate 0, -15, -5, 0, 0, -12, 0; hip translate y 0, -4, 4, 20, 12, -4, 0; thigh_back 0, 57, 17, 82, 37, 52, 0; thigh_front 0, 22, -18, 37, -3, 17, 0; shin_back 0, -71, -16, -111, -41, -66, 0; shin_front 0, -69, -14, -99, -34, -64, 0; arm_back_upper 0, -2, 138, 83, 113, 15, 0; arm_front_upper 0, -55, 85, 30, 60, -38, 0; arm_back_lower 0, 15, 15, 45, 5, 25, 0; arm_front_lower 0, 24, 24, 54, 14, 34, 0. The scarf trails the motion: it drops behind while he rises and lifts up while he falls, settling after the landing. Events: 'takeoff' at 0.3 and 'land' at 0.75. Leave idle and run as they are.
The same approach: the poses in words, the numbers per bone, two events for the game — takeoff to start the physics and land for the dust and the sound.
Prompt 4 — the hump behind the shoulder
On the widest arm swings a brown block stuck out behind the near shoulder. The joint sat on the upper edge of the shoulder cap — that is how the model read "the middle of the top of the sleeve" in the first prompt — so the cap swung around a corner instead of turning in place.
The shoulder joints sit on the edge of the shoulder cap, so on big swings the cap sticks out behind like a hump. Move both joints to the middle of the cap without moving anything on the canvas (set_bone with hold): arm_back_upper to x 23.53, y 7.53; arm_front_upper to x 18.79, y -10.46 (local to torso). Do not change any keys.
Moving a joint while holding the picture still changes no keys and nothing on the canvas; only the pivot moves, and every animation now turns the arm about the middle of the shoulder. With the mouse the same is a drag of the bone start with ⌥ held — all mouse controls. Next time we would simply write "the shoulder joint in the centre of the shoulder cap".
Crisp pixels in your engine
The export is plain Spine 4.2 JSON with an atlas that already says filter: Nearest, Nearest. What is left is drawing at native resolution.
Web, spine-canvas — the demo above, full code in main.js:
// 1 art pixel = 1 canvas pixel
low.width = 72; low.height = 106;
lowCtx.imageSmoothingEnabled = false;
renderer.draw(skeleton);            // spine-canvas, into the small canvas
// a pixel is either there or not
const img = lowCtx.getImageData(0, 0, 72, 106);
for (let i = 3; i < img.data.length; i += 4)
  img.data[i] = img.data[i] >= 128 ? 255 : 0;
lowCtx.putImageData(img, 0, 0);
// scale up with nearest-neighbour
screenCtx.imageSmoothingEnabled = false;
screenCtx.drawImage(low, 0, 0, 72 * 6, 106 * 6);
Phaser 4 — make the game as small as your art and let Phaser scale it (loading the skeleton: Phaser tutorial):
new Phaser.Game({
  width: 320, height: 180,     // the game's native resolution
  pixelArt: true,              // nearest filtering, rounded positions
  scale: { zoom: 4 },          // scaled up as whole pixels
  plugins: { scene: [{ key: "spine.SpinePlugin", plugin: spine.SpinePlugin, mapping: "spine" }] },
  scene: Level,
});
PixiJS 8 — the same idea: a small canvas, nearest sampling, CSS upscaling (loading the skeleton: PixiJS tutorial):
import { Application, TextureSource } from "pixi.js";
TextureSource.defaultOptions.scaleMode = "nearest";
const app = new Application();
await app.init({ width: 320, height: 180, antialias: false, resolution: 1 });
app.canvas.style.width = "1280px";           // 4x
app.canvas.style.imageRendering = "pixelated";
Unity — on the atlas page texture set Filter Mode to Point (no filter) and Compression to None; add a Pixel Perfect Camera (2D URP) with Upscale Render Texture on, so rotated parts are resampled at the reference resolution (importing the skeleton: Unity guide).
What saves prompts with pixel art
- Describe the motion with directions. "Knees bend back, elbows bend forward", "the scarf streams back to the left, close to horizontal". A bare angle can go either way. More in How to write a request.
- Ask for stepped keys when you want frames, and for whole pixels.
- Name sides by the picture. "The near leg (on the left of the picture)" leaves no doubt; front and back can mean either.
- Exact poses: give offsets — the screen angle you want minus the bone's rest angle — or set them with the mouse.
- Check on the 1:1 render. A pose that looks fine scaled up smoothly can lose a pixel of the hand at native size.
Coming next: from one picture to layers
Riggy starts from a layered PSD. We are building a tool that cuts a single character picture into named layers in the right order, with the hidden parts drawn in. For a bigger, painted character see a monster's combat set from one PSD. Shipping a game with the Spine Runtimes requires a Spine license from Esoteric Software, whoever made the skeleton — see licensing.