What's new in Riggy: October 15–25, 2026
Riggy turns a character picture into a Spine 4.2 rig with animations through a chat. From October 15 to 25 most of the work went into cutting one flat picture into parts. An idle sway needs a few large parts, a walk needs separate legs with knees, and now you say which you need and look at the planned parts on your own picture before anything is cut. The parts come back with their joints in place, and you can add a missing picture to a rig that is already made.
Choose what should move before the cut
Oct 20. Drop one PNG or JPG, and a card asks what should move: the whole body swaying, the head and face, the arms, the legs for walking and jumping, hair or a cloak, or everything in detail. You can also say it in your own words. “Plan the cut” puts the request in the message box, and you send it when it reads right.
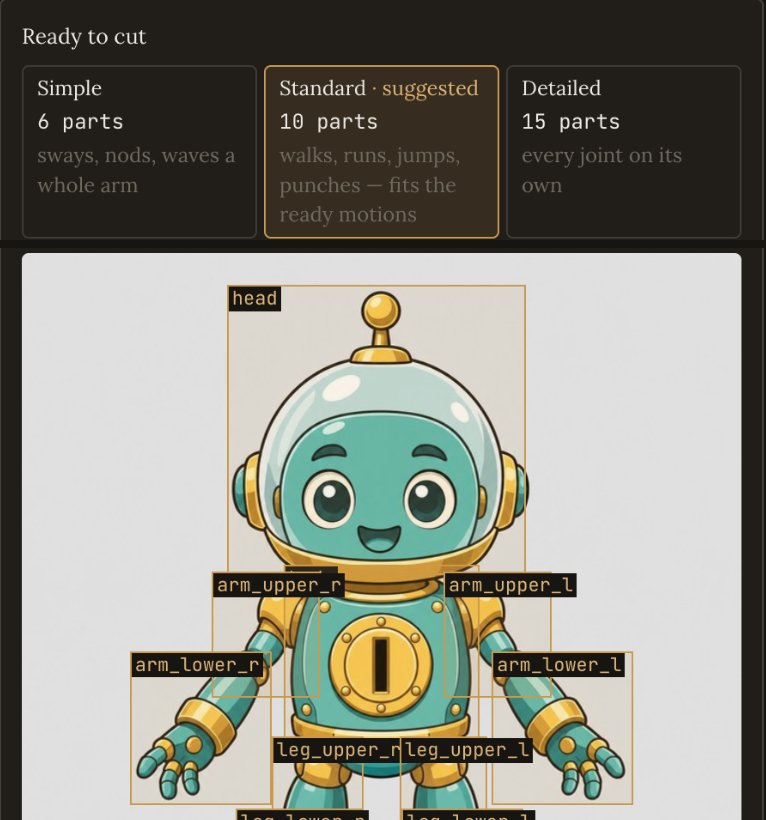
The plan comes back in three sizes, Simple, Standard and Detailed, each saying what the rig will be able to do, with one marked as suggested. Under them is your picture with the parts of the chosen size boxed and named, and a few lines on what moves with what. Once the plan is there, switching between the sizes is free, and nothing is cut until you press the Cut button. If a box misses a part, say so in the chat first. A whole cut step by step, with what we corrected: Turn a PNG or JPG into a Spine animation.
Parts come back with their joints in place
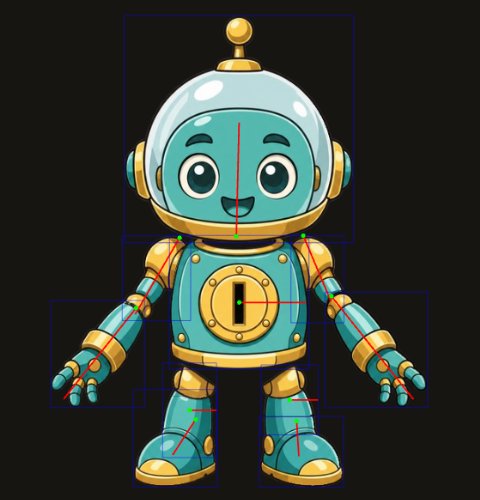
Oct 15. After the cut, each part hangs on the part it belongs to, a forearm on the upper arm and the arm on the body, and its bone starts where the two meet. So an arm swings from the shoulder and a head nods at the neck, and the character's resting pose stays exactly as drawn. Before, the AI placed these bones itself, and a part could end up turning around a point far off the picture.
The cut rig looks like your picture
- No copy left behind a moving part (Oct 15). Under the parts, the cut also returns the whole picture as a backing. It is now erased wherever a part covers it, so when an arm moves, no second arm stays behind it.
- Parts named as drawn (Oct 15). The plan names clothing as it is drawn, a sleeve rather than a bare upper arm, so the sleeve moves with the arm. A plan for a person has to include both arms and both legs.
- The right part on top (Oct 17). Where two parts overlap, Riggy looks at your picture to decide which one is in front, instead of taking the order the parts came back in. That is what keeps boots over the shins and hair from covering a face.
- Your colours (Oct 20). What you can see takes its colour from your picture, and the cut only paints what is hidden behind other parts. In our test cuts, a fifth to a quarter of the visible pixels used to come back in another tone. A white dress on a white background is no longer mistaken for background either.
- A check you can read (Oct 17–20). After the cut, the summary compares the assembled rig with your picture and says what is left uncovered and where, such as “71 px below leg_l”. It also names a part with little painted behind it, so you know to keep its swing small.
After the cut: ready motions that fit this rig
Oct 18. Under the cut, a card lists the ready motions available for this rig as buttons; pick one to watch it on your character before you add it. Walk, run, jump and punch appear only for a character drawn from the side that has the parts they need, and if nothing fits, the card says why. If you asked for a motion in the same message as the cut, the card offers it back as a phrase to send. How each action of a game character is made: game character animations for Spine.
Add a picture to a finished rig
Oct 25. A hat, a sword or a second eye no longer means remaking the PSD. Press “+ Picture” at the top of the bone tree, right-click a bone and choose “Add picture here…”, or drop the file on the canvas. It becomes a new part on its own bone, under the bone you selected and where you dropped it, drawn above the other parts. It is selected right away, so you can drag, rotate and scale it with the mouse. Adding the file itself starts no AI request; to place it by meaning, ask in the chat, for example “put the hat on the head”. On a phone, “Add art” does the same in a rig that already has parts.