Turn a PNG or JPG into a Spine animation
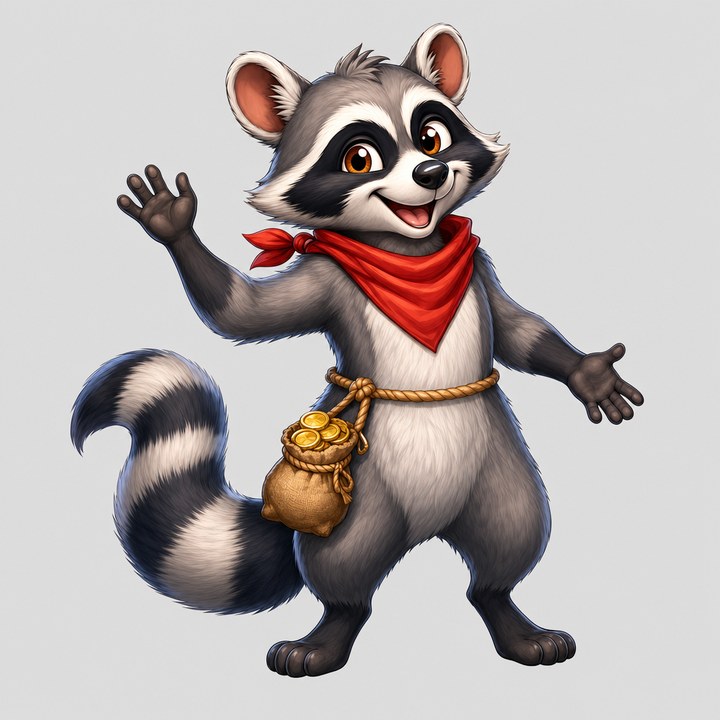
Start with one character image. Cut it into parts in Riggy, animate it in chat, and export to Spine 4.2. You can now start from one flat PNG or JPG instead of preparing separate parts. Below is a slot-game mascot taken from one flat picture to an idle loop and a win celebration — the key prompts quoted verbatim, with a summary of the corrections.
From this picture to this animation
The output: a Spine 4.2 skeleton with 11 parts, played here by the official Spine Web Player. Switch between idle and win. The head, the ears, both arms, the tail and the coin sack move on their own bones; the torso bends while the hips stay on the legs.
Step 1: say what it is and what should move
Drop the picture into a new project. Riggy sees that it is one flat image and offers to cut it into parts; a chip puts the start of the request in the chat box, and you finish the sentence. Usually you only say what it is and what should move, and the model plans the parts itself. This request also gives a box for every part, in thousandths of the picture — the lesson of earlier cuts described below:
Cut this picture into parts: it is a raccoon bandit, a slot-game mascot. Later it needs an idle and a win celebration where it raises its paws. Each arm is one part from the shoulder to the paw, not split at the elbow. Use exactly these 11 parts and boxes (thousandths of the picture: left, top, right, bottom): head 340, 60, 710, 360; right_ear 310, 70, 430, 200; left_ear 570, 30, 655, 145; bandana 330, 290, 670, 495; torso 391, 293, 752, 781; right_arm 146, 210, 454, 488; left_arm 640, 361, 898, 605; right_leg 361, 674, 527, 942; left_leg 581, 674, 801, 933; tail 95, 480, 420, 860; sack 365, 575, 525, 745.
The model looks at the picture and answers with a plan: the parts by name and an estimate on the Cut button. Nothing is cut yet.
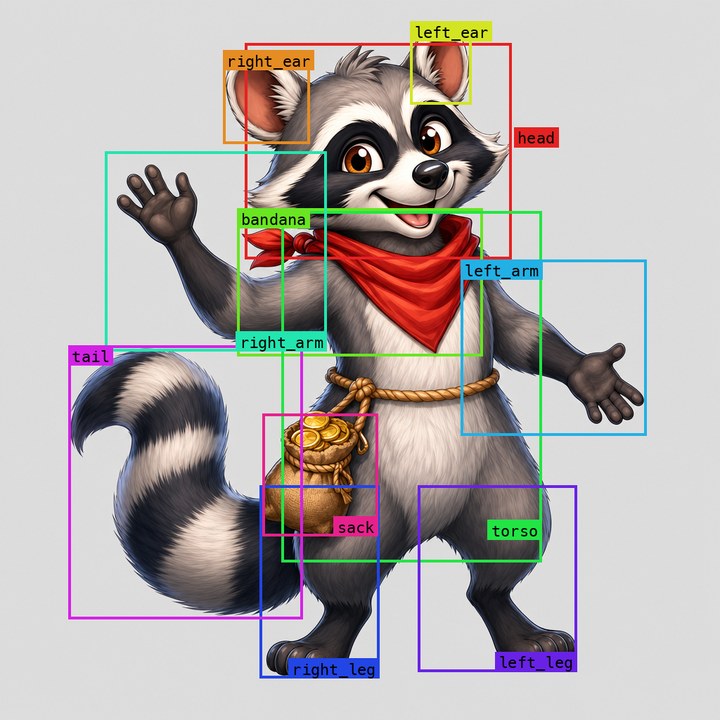
Step 2: cut — hidden areas are painted in
The button sends the picture out to be cut. In this example a cut took about two minutes. Riggy asks for hidden areas to be painted in so neighbouring parts overlap at the joints — here the neck under the bandana, the shoulders under the torso, the top of each leg, the base of each ear. It assembles the returned parts into a starting rig, a part and a bone for each. Check the result against the original image and in motion.
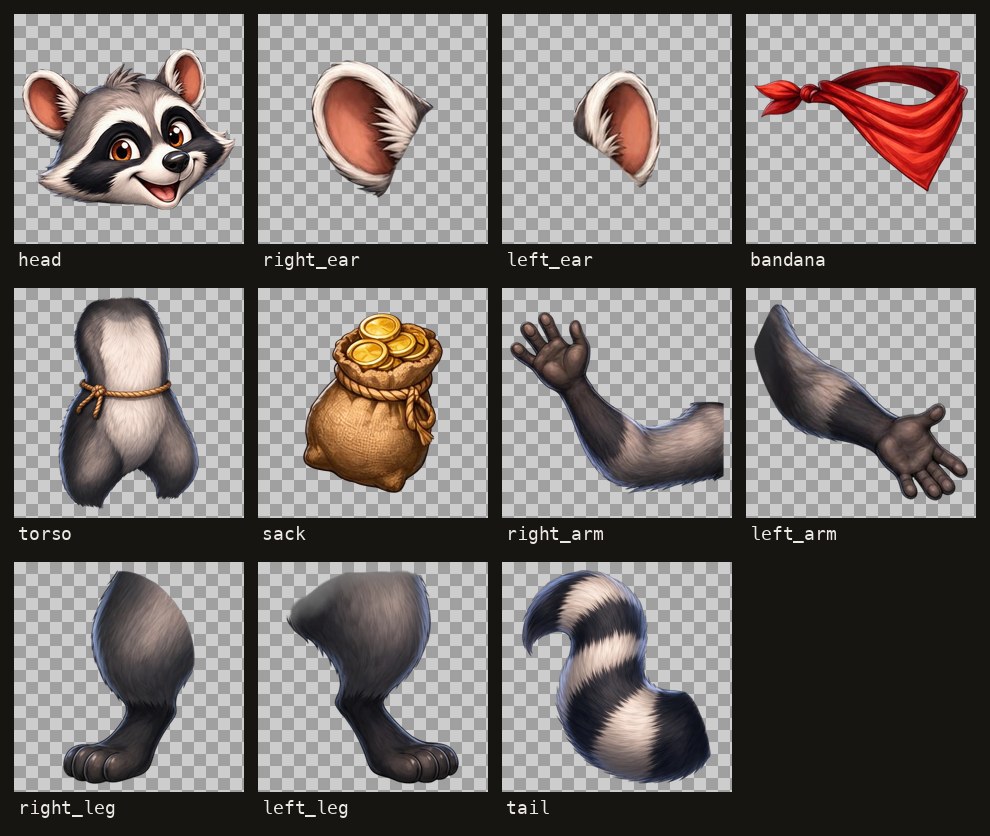
The final cut shown here cost less than $1. Earlier cuts were charged separately, as are planning and animation requests. The button shows an estimate; the final charge is based on the returned parts.
Step 3: animate in chat
Now rig it and make two animations. First tidy the parts: remove the background part, put both arms behind the torso, and put the head above the bandana. idle: a calm 2-second loop, it breathes, the head bobs a little, the ears twitch once, the tail sways slowly and the sack swings slightly. win: a 1.6-second celebration, both arms swing up and out to the sides and wave, the paws at about head height and always clear of the head and ears, the head tilts side to side, the ears twitch, the tail swings fast and the body does a small hop, ending in the rest pose so it loops.
Riggy placed the joints from where the parts touch — hip, torso, head, shoulders, the tail base — and wrote both animations. In idle the torso turned while the legs stood still, and the thighs drawn on the torso slid over the legs, so one more line:
In idle the torso turns while the legs stay still, and the thighs drawn on the torso slide over the legs, so each leg looks doubled at the hip. Make the torso bend instead of turning as one piece: the hips and thighs stay with the legs, only the chest and shoulders move. Check both animations at their extreme moments that the thighs stay on the legs.
Riggy added a waist and a chest bone, so the torso now bends above the hips instead of turning as one piece.
Smaller things are free with the mouse: pick a moment of the animation and turn a bone (reshaping a moment).
What we corrected in this example
The cut above is not the first one. Earlier cuts of this picture, in another project, went wrong in different ways. One distorted the face — an extra cheek appeared next to the head. Another came back with blocky parts with straight edges. Then the author measured each part on a grid over the picture and gave tight boxes in chat, and the rest pose looked clean.
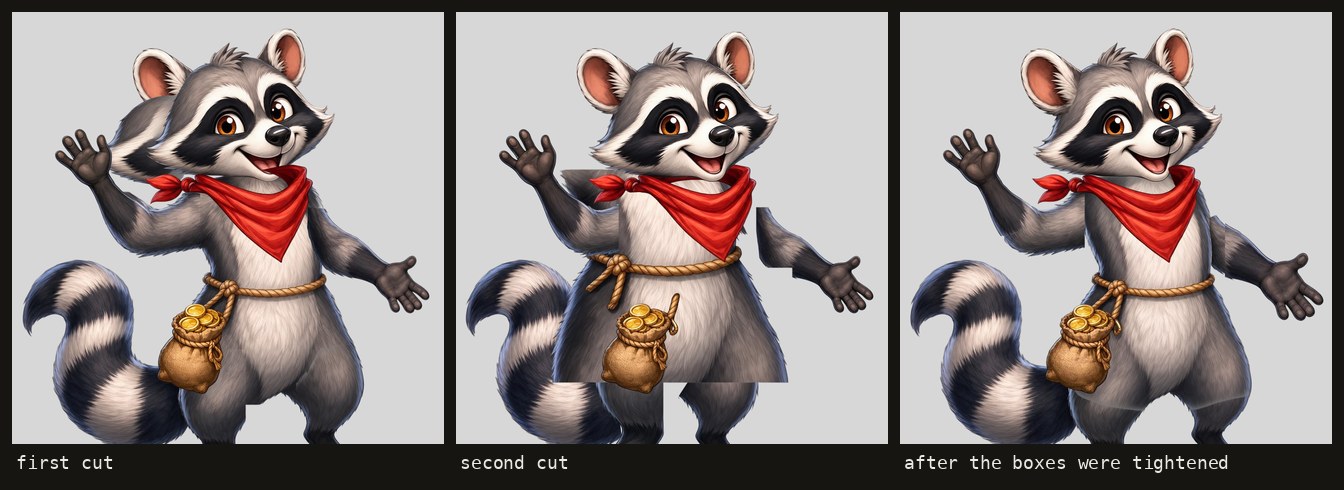
In motion the tight-box cut was not clean. It split each arm at the elbow, and the tight boxes ended right at the shoulder and the elbow, so the pieces came back cut straight along the box edges. When the paws went up in win, those straight edges and the bits of arm left on the torso showed.
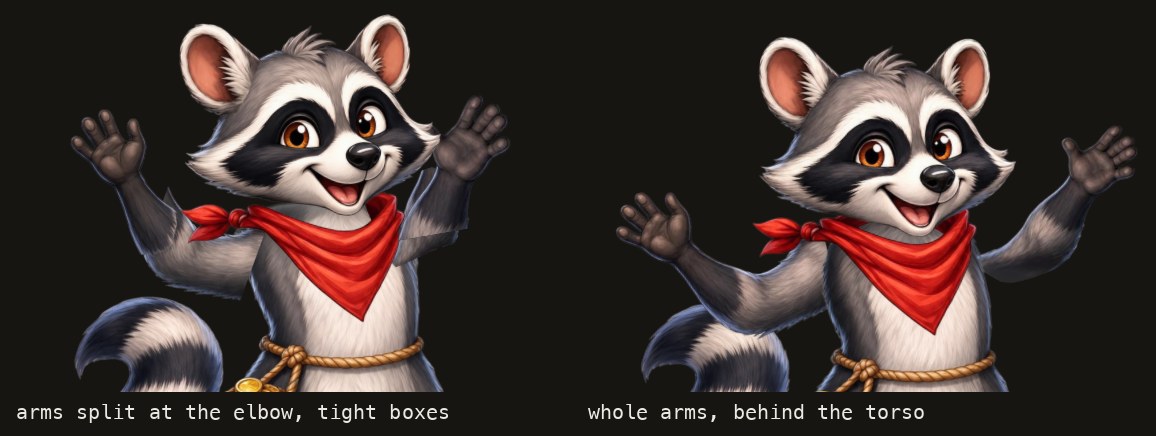
What fixed it: each box takes in its whole part with the joint and a margin; an arm that does not need to bend at the elbow stays one part; and the arms are drawn behind the torso, so the edge where an arm meets the body sits under it. So look at the parts and play every animation before you export. If a part came back wrong, revert to the version before cutting, ask the chat to list or revise the planned boxes, and cut again. Each new cut is charged separately.
Limits
- The hidden areas are painted by AI. They can change small details of the drawing; check the parts and the animation in motion.
- Some pictures cut more cleanly. Clear outlines and limbs held away from the body are the easy case; long fur and an arm drawn across the body need a closer look at the joints.
- The whole picture is cut at once. To redo one part you undo and cut the picture again. A cut that fails is not charged; the planning request is.
- Plain or transparent background. An empty background is dropped; a painted one stays as a
backgroundpart at the bottom. - The longer side must be no more than three times the shorter side, and so far the cut was tried on painted art — pixel art has not been tested with the cut yet.
- In the web app. The terminal chat does not cut pictures.
Export and next steps
The export is plain Spine 4.2 JSON with an atlas and a page image: import the JSON into Spine 4.2 using Import Data, with the exported images folder, or load it straight into a game — Phaser 4, PixiJS 8, Unity. Already have a layered file? Start from it: PSD to Spine, or see a monster's combat set from one PSD. Getting a picture ready: preparing art. Using the Spine Runtimes in your game requires an appropriate Spine Editor license at integration time, regardless of who created the skeleton — see licensing.